Rigging a Symmetric Spinnaker
Go To: Sailing - Techniques and Manoevres
Posted on 03 September 2009 18:32
Rigging a symmetric spinnaker isn’t too difficult – it’s just a case of making sure you get the lines in the correct places. Check out our photo guide to get it right next time you try.
There are six main lines or ropes for a symmetric spinnaker – the halyard, the retrieval line, the two sheets, and a pole uphaul/downhaul. There are six lines – but you can do this with only three ropes – the halyard and the retrieval line can be rigged as one long continuous line, the pole uphaul/downhaul can be rigged as one line, and the sheets can be setup as one line, although these are best kept as two separate lines still, ideally a green flecked line for starboard and red flecked line for port.
The halyard should be attached to the top corner of the sail (the head, as in Photo 2), and the halyard line fed through the appropriate fittings in the cockpit – if it’s a continuous halyard/retrieval line , you will usually find a number of pulley blocks located in the cockpit, to enable the line to come into the cockpit, turn around, and go back out again as the retrieval line, as shown in our Laser 2 in Photo 1. The retrieval end of the line usually attaches to the outside of the sail, to the retrieval patch. Depending on the size of the spinnaker, there may be one or two retrieval patches; Laser 2’s should have two patches for example (although ours only has one), while the Mirror spinnaker, much smaller at only 6 square metres, only has one patch. Attach the line end to the patch using a bowline (Photo 4), no shackles or hardware should be needed - you may find it easier to partly hoist the sail to do this, as we have done in Photo 3. This end of the line won’t be under high tension, so a bowline is sufficient. Make sure your retrieval line goes around the outside of everything – the jib, the forestay, the jib sheets etc.
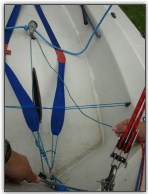
Photo 1, The continuous halyard/retrieval line
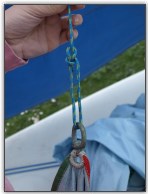
Photo 2, Attach the halyard

Photo 3, Hoist the sail
Spinnaker Sheets
Attach your sheets to each bottom corner of the sail – some sailmakers put a coloured trim around the edge of each bottom corner, as you would expect green for starboard and red for port (shown in Photo 5). Make sure that these sheets go around the outside of everything – the shrouds, the jib sheets etc. Next, lead the spinnaker sheets through any blocks they should go through to lead them into the cockpit, as in Photo 6.
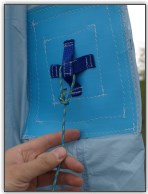
Photo 4, Attach the retrieval line
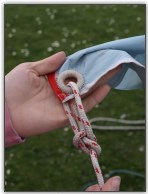
Photo 5, Attach the spinnaker sheet
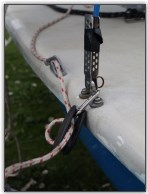
Photo 6, Lead the sheet through the blocks
You’re now ready to pack the spinnaker. It’s a good idea to rig it in the hoisted position (Photo 7) when you are starting out, to make sure everything is setup correctly – now you should drop it, and pack it, as in Photo 8. Some symmetric boats have spinnaker chutes, but most have a bag launching system. To pack the spinnaker, you should pull it down, and put the middle, with the retrieval patch, in first. Push this to the bottom of the bag, and bunch in the spinnaker after it. Try not to get any ropes tangled – continue packing it like this until you reach the three corners (two bottom and the head), and pack these into the top of the bag, sticking out (Photo 9), with the ropes sticking out. This is so when you hoist it, it comes out with the corners first, and goes up easily.
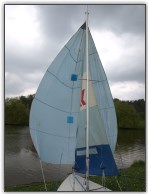
Photo 7, The spinnaker rigged and hoisted
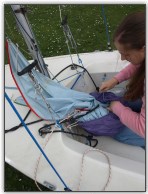
Photo 8, Pack the spinnaker into its bag
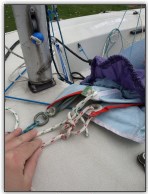
Photo 9, Leave the three corners out of the bag
Similarly, if you are using a chute, and you pull on the retrieval line, it will go all the way through the chute, and pull the centre of the spinnaker down first into the chute, along the length of the chute, and will end up with all three corners sticking out of the front end of the chute.
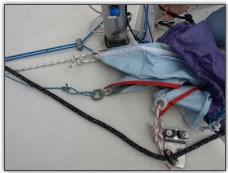
Photo 10, Spinnaker setup ready to use, the three lines leading under everything else
Pole rigging
The other piece of kit you need for a symmetric spinnaker is a spinnaker pole. This is a metal pole, usually between 1 and 2.5 metres long (depending on the size of the spinnaker) which is used to hold the one bottom corner of the sail out away from the boat, to hold its shape better. This must be kept inside the boat when not in use – in some boats you will need to clip it alongside the boom whereas in others it can go under the foredeck inside the boat – you can get clips to attach to the side of the boom to clip it onto, or some small pieces of tubing to sit it in. Some classes even allow a pole launching system to be rigged up, so when you pull a length of rope, it pushes the pole out.
The final piece of rigging is the spinnaker uphaul/downhaul. These lines are used to control the height of the pole, which in turn controls how well the spinnaker is set. Some boats use two separate lines, the uphaul attached to the top of the pole, to allow it to be pulled upwards, and the downhaul attached to the bottom of the pole, to allow it to be pulled downwards. There is an alternate way.
On our Laser 2, we have an integrated uphaul/downhaul system. From a bullseye fitting on the mast (see Photo 11) we have tied a length of medium thickness bungee cord elastic, with a hook tied to the bottom end of the cord. This hook also has leading from it a length of rope (see Photo 12), which leads downwards through a cleat on the mast. Using this arrangement, the hook can be hooked onto the top of the spinnaker pole. The elastic cord will pull the pole upwards, but the rope can be used to pull the pole downwards, and when cleated, will hold it in position, with the elastic acting as the uphaul, and the rope acting as a downhaul. Be wary however – not all classes allow this, so check the class rules first.
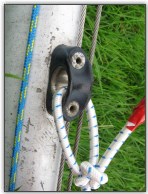
Photo 11, The top of the uphaul
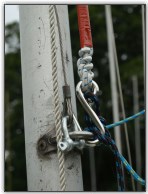
Photo 12, The uphaul/downhaul waiting to be used
Finally, you may find you need to add a spinnaker sheet catcher to the front of your boat. This is usually something that extends out from the front of the boat, usually no more than 12 inches, to catch the spinnaker sheets and stop them from dropping underneath the boat when the spinnaker is dropped. Some boats have particular kits you can attach, with ours we just took some leftover bungee elastic, doubled it over, and taped it with black electrical tape, then taped it to the front ring on the bow. It extends out 6 inches, and catches the sheets.
Rigging a symmetric spinnaker is key to using it correctly – if you rig it badly, you’ll give yourself all manner of problems on the water when you try to use it. If the wind isn’t too strong, you may even wish to try launching it and dropping it a few times on land, just remember to turn your boat away from the wind first.