Seamanship - Anchoring
Go To: Sailing - Techniques and Manoevres
Posted on 26 November 2009 18:22
For the racers amongst you, anchoring is something you’ll probably never do. However, if you plan to start going out day sailing around the coastline, it’s a really important skill to perfect.
”I don’t need to learn how to anchor, I’m not going to stop anywhere long enough to anchor.” If you have this kind of attitude towards sailing, particularly around the coastline, you need to be rethink your approach. Anchoring is not just required for mooring up a yacht in a harbour overnight – you might want to set anchor in strong winds for 10 minutes to take a breather, or to reef the sail. It might be something as simple as wanting to stop for half an hour to eat some dinner, or as serious as the tides are too strong to sail against and you need to anchor up until they change enough for you to sail on. There are also other clever applications, such as anchoring up off a lee shore with a long anchor rope (warp), then lowering yourself back onto the lee shore, so you can pull yourself back off it later.
No matter what the use – anchoring is an important skill for anyone who plans to sail on coastal waters, and it’s not difficult to get to grips with. What you need, of course, is an anchor. There are lots of different types of anchors, and for larger ships they can cost into the tens of thousands of pounds. For a small dinghy, you will be after a folding grapnel anchor. You shouldn’t need one larger than a few kilograms, and about 18-24 inches long for larger dinghies. Folding anchors have typically four arms that extend out and can be locked into place (see photo), but can be unlocked, and folded up so they won’t get in the way when not being used. It’s best to keep a small bucket handy to store the anchor and chain in.
As well as an anchor, you need an anchor line (or warp). This is usually part rope, part chain. The more chain you use for an anchor line, then less rope you require. This is because chain is heavier, and pulls the line towards the sea bottom. Rope is lighter and tends to float, and because of this, the anchor will not sit on the bottom properly. The anchor must sit on the bottom so that the anchor arms dig in (see diagram).
So, instead of using rope, let’s just use chain, right? If you’re planning to sail on coastal waters, even only a few hundred metres off shore you could be sailing in water reaching depths of 50 metres or more, and 50 metres of even inch-long link chain is a lot of chain! Therefore, there’s a trade off. You need at least a few metres of chain, to hold the anchor down, and the rest rope. How much line do you need? The general rule is to take the depth you plan to anchor in, and use 7x the depth in rope, or 5x the depth in chain, the reason being is the boat will not sit over its’ anchor point, but typically drift back downwind of it, as shown. So, for 10 metres depth of water, with 3 metres of chain, you’d need roughly 35-40 metres of rope – that’s still a lot of rope! Estimates on how much rope/chain you need vary – some people like to play it safer than others. We’ve gone for a middle of the road estimate.
Setting up your boat for anchoring
Before you go on the water you need to do some boat setup. You’d expect the anchor to be led from the front of your boat, but it must be led from a strong point on your boat. If you attach the end of your anchor line to your painter, in anything above relatively calm seas, with a few feet of swell and waves you’ll find the front of your boat quickly ripped off. Therefore, you should secure your anchor line around your mast. It does need to be led from the front of the boat though – so you should tie a short loop of rope around the front of your boat (if there is a loop or fitting there), or even tie a short loop near the base of your painter rope. Lead the end of your anchor line through this loop (do not tie it to it), and then to the mast. It’s best to secure the end of the rope around the mast using a round turn and two half hitches – why? You use this knot when securing your boat to a mooring, because it won’t untie itself when jerked or pulled upon. If you use a bowline to tie your anchor line to your mast, if the rope constantly snatches and loosens (which anchor lines tend to do), a bowline may come undone.
So, your anchor is now attached to the mast of your boat, and led through a loop of rope on the front of the boat. You should now bring the anchor down the side of your boat, around the shroud, and inside the boat, placing it in a bucket. You need to coil the rope into the bucket first, followed by the chain attached to the anchor, and finally the anchor on top (as the anchor will come out first, followed by the chain, then the rope). Now your anchor is ready to go, and so are you!
How to anchor
So, at some point when sailing along, you decide you want, or need, to anchor. Where you do this is important – make sure you are about to anchor somewhere suitable. Lookout for any nearby obstructions or dangers, as you will swing on your anchor. If you planned the route you were going to take you would pay attention to underwater obstructions, such as wrecks, shallow areas, or underwater cables, which are usually indicated on maps. Is your area clear? Let’s anchor then.
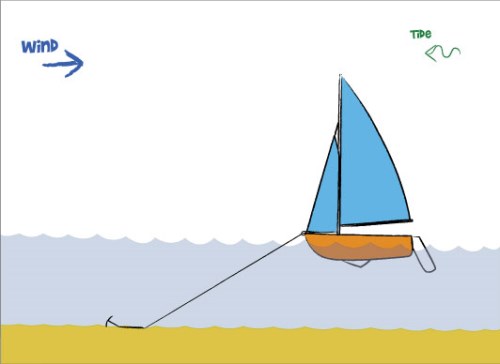
Diagram 1: Anchoring in Wind against Tide, with stronger wind than tide.
It’s important that you have as little forward momentum as possible when setting anchor, otherwise you will drift forwards over your anchor line and may well catch the line around your centreboard or rudder, and it’s not easy to get them free without getting wet! Sailing backwards is always an option to get a little backwards motion, or if you are trying to set anchor in a wind against tide situation, and the tide is much stronger than the wind (i.e. the wind can’t stream you back downwind from your anchor as the tide pushes you upwind), you could always drop the sails and let the tide keep you away from your anchor.
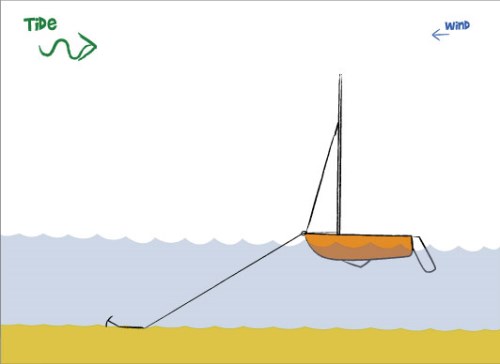
Diagram 2: Anchoring in Wind against Tide, with stronger tide than wind.
When ready, the crew takes the anchor out of the bucket, unfolds it and locks the arms into place, and lowers it over the side of the boat – be careful as these arms will easily punch holes into fibreglass or wooden hulls. Lower the anchor into the water slowly – don’t throw all of the anchor line over the side at once as it has a good chance of tying itself into knots or catching on your boat if you drift over it. Play or feed the anchor line out slowly. If you do this, you should be able to feel the anchor touch bottom. Feed out some more, as the boat drifts backwards off the anchor. You may not need to feed out all of the anchor rope – if it’s much shallower than you anticipated, you can always shorten the rope by tying a few arm lengths of it into a bundle – make sure you can untie it easily enough, but also be sure it won’t untie itself.
With the boat drifting backwards, you should be able to feel the anchor catch on the bottom (unless it is deep and the conditions rough), and you can give it a short, quick tug to see if it’s holding fast. Whether you feel the anchor catch or not, the final check to see if your anchor is holding is to make a transit with two points on the shore. Keep an eye on it for a minute or two; if they don’t move, your anchor is holding. This can be quite tricky, as you may be drifting from side to side on your mooring, depending on conditions. You should now be anchored, and free to do whatever you wish to do, or wait for the tide to change.
Leaving anchor
At some point you will need to lift the anchor, and sail off (unless you’re waiting for a coastguard rescue). The order in which you do things can vary slightly, but it’s usually a good idea to have everything ready to be able to sail straight off, so if you dropped your sails while anchored, or too anchor, unless tidal conditions will make it awkward to raise your sails given the direction of wind against tide, it’s a good idea to hoist your sails first.
To pull up your anchor, you do just that - take hold of the anchor line, and start pulling it in. As its leading from the front of the boat, you have two options – either kick the rudder over and let the boat drift sideways, so you can reach the anchor line, or if you start pulling it in from in front of the mast, you should be able to get the boat to drift sideways, and then reach the line from the shroud. You need to get the anchor in over the side, behind the shroud from where you launched it, so it’s ready for its’ next use. Have the bucket ready, and start dropping the anchor line/rope/warp into the bucket as you pull it in.
Unless you have a really heavy boat or conditions are really bad you should be able to pull the anchor in this way; eventually as you are pulling the boat will drift towards the anchor, the anchor will dislodge from the bottom, and you will be able to pull it up, into the boat, and into the bucket.
If you have a heavier boat, and cannot pull the line in like this as the boat is too heavy to pull along the anchor line, or you are not strong enough to do it, you will need the helm to put very small bursts of speed on, moving the boat forward slowly as you pull in the anchor line.
With the anchor back in the boat, you should now be able to sail off.
Summary
Anchoring, while not a skill many inland sailors will use very often, is an invaluable part of the coastal sailors’ skills. Many accidents and rescues are attended to every year by the RNLI and the coastguard where people didn’t prepare for conditions properly when they went out, and having the required skill to sail the conditions you are going out in is very important. Anchoring is not a difficult skill to master, but does require a little fore thought and planning.